Clicking on the “Deals” tab in ActiveCampaign takes you to our comprehensive CRM, a feature exclusive to our Plus, Professional, and Enterprise plans. You can use it to automate and manage your sales processes. Actually, you can use our CRM to automate any business process — internal or external. For example, you could use it to automate product fulfillment or employee onboarding.
In this foundational guide, we focus on the CRM strictly as a sales tool — a flexible, powerful sales tool.
We explain the CRM, discuss all it encompasses, and tell you how to get the most out of it.
Pipelines, Stages, And Deals, Oh My!
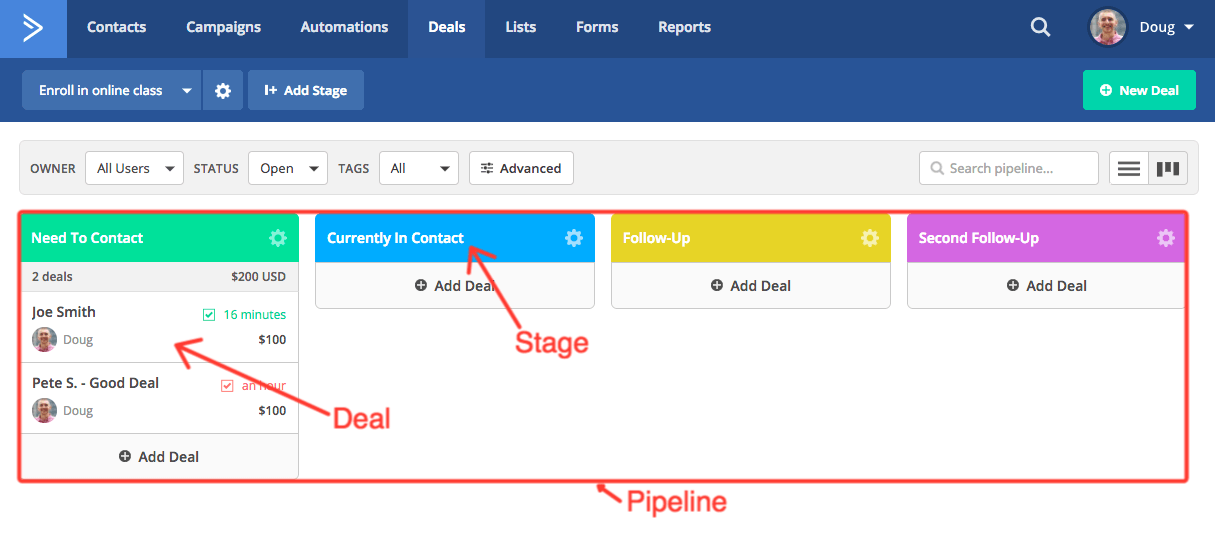
The three main parts of our CRM are pipelines, stages, and deals. Let’s define them all.
What are deals?
Think of deals as a way of identifying qualified leads as sales opportunities. Deals are contacts that no longer sit dormant in your database; they’re actually in your pipeline and are on track to become customers.
Being clear on what criteria makes a lead qualified is important. Lead scoring is one of the most effective ways to qualify prospects.
Assigning points to contacts based on their actions is commonly done to sort out qualified leads from the bunch. However, lead scoring is far from the only method for qualifying prospects. You can use the segment builder in ActiveCampaign to qualify your leads in a variety of ways.
When a deal is created it is assigned to an internal team member who monitors and manages the movement of deals from stage to stage in your pipelines.
What are pipelines?
Pipelines are your business processes — sales-related and otherwise. For example, sales pipelines could be “Enroll in online class” or “Buy Shirt.” They represent the entire process of converting qualified leads into customers.
You can setup as many pipelines (or processes) as necessary for your business since ActiveCampaign does not limit the amount of active pipelines you can create.
What are stages?
Pipelines contain stages. If pipelines are your processes, stages are the steps that deals must advance through to complete those processes (and in many cases, for you to close sales).
For example, stages could be “Need To Contact” and “Currently In Contact” and “Send Proposal.” Click “Add Stage” in the upper left corner to create stages.
You can toggle between various pipelines, search for pipelines, and add new pipelines by clicking the “Pipelines” button in the upper left corner of the CRM.
When creating pipelines, you name them and choose a currency. You also determine if deals added to that pipeline are automatically assigned to internal team members via a round robin system (whoever’s turn it is) or automatically distributed to certain team members based on deal value. You can also choose to disable auto assignment of deals in that pipeline altogether.
Note: When creating a deal — not a pipeline — you can select what team member (user) is responsible for that deal, or you can choose “Auto.” Choosing “Auto” assigns deals according to the auto-assignment setting you chose when crafting the pipeline.
In summary, deals represent leads that are potential customers. In our CRM, you can easily view where deals are in your stages and pipelines. Likewise, you can filter what deals you see based on their status.
“Open” deals are those that are active. “Won” deals are those that achieve the goal of the pipeline (e.g. buy a product or are successfully on-boarded). “Lost” deals are leads that enter your pipelines but do not convert.
You can relate deal status to fishing. You’re the fisher, the fish are leads. Your goal is to catch as many fish as possible. “Open” deals are fish that take your bait and are hooked. “Won” deals are fish you actually reel in. “Lost” deals are fish that get hooked, only to break your line and swim away.
How Deals Are Created And Displayed
As previously mentioned, a marketer or salesperson sets criteria for contacts to meet in order to enter a stage in a pipeline. When contacts meet the criteria, deals are created to reflect the new business opportunity and to track it through stages in a pipeline. You can create deals manually, and you can automate the creation of deals.
Manually create deals
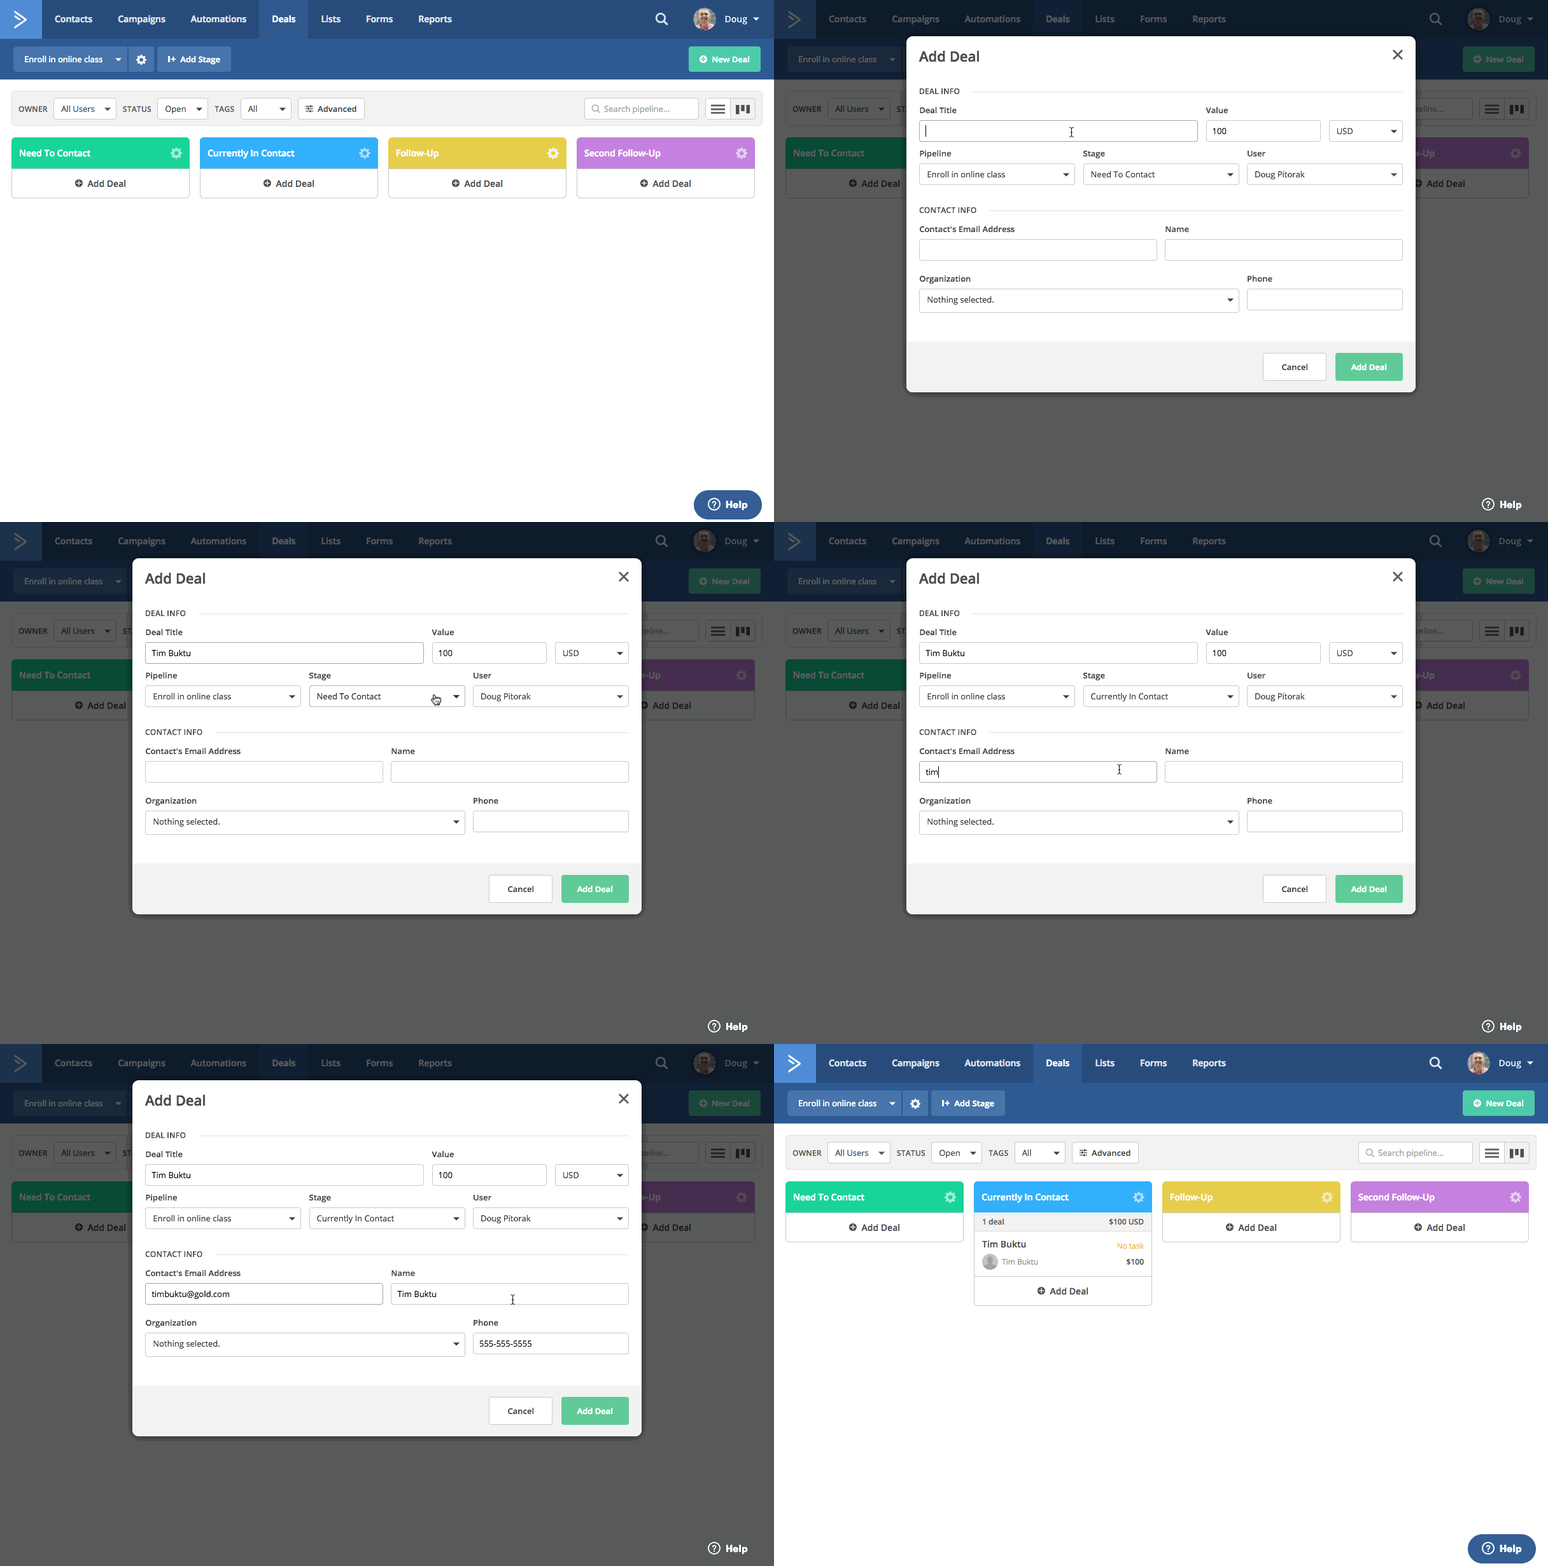
To manually create deals, click on the “Deals” tab. You’re now in the CRM. Click the green “+ New Deal” icon in the upper right corner. An “Add Deal” window appears. Simply fill out the information and click the green “Add Deal” button in the window.
Display of deals
Just below the “+ New Deal” icon are two buttons that control the display in the CRM. Clicking the right icon arranges pipelines and their stages horizontally. In that view, you can also manually create deals by clicking the “+ Add Deal” button at the bottom of each stage. The deals stack vertically under the stage you add them to.
If you click on the left icon below “+ New Deal” the CRM switches to “Tasks View.” Here, deals are arranged vertically and are grouped according to their tasks. In ActiveCampaign, examples of “tasks” include “call this contact” and “send contact an email” and “invite contact to lunch.” You can think of “Tasks View” as a to-do-list of engagement tasks that you can knock out in a day’s work, whereas the first view provides an overview of your entire pipeline.
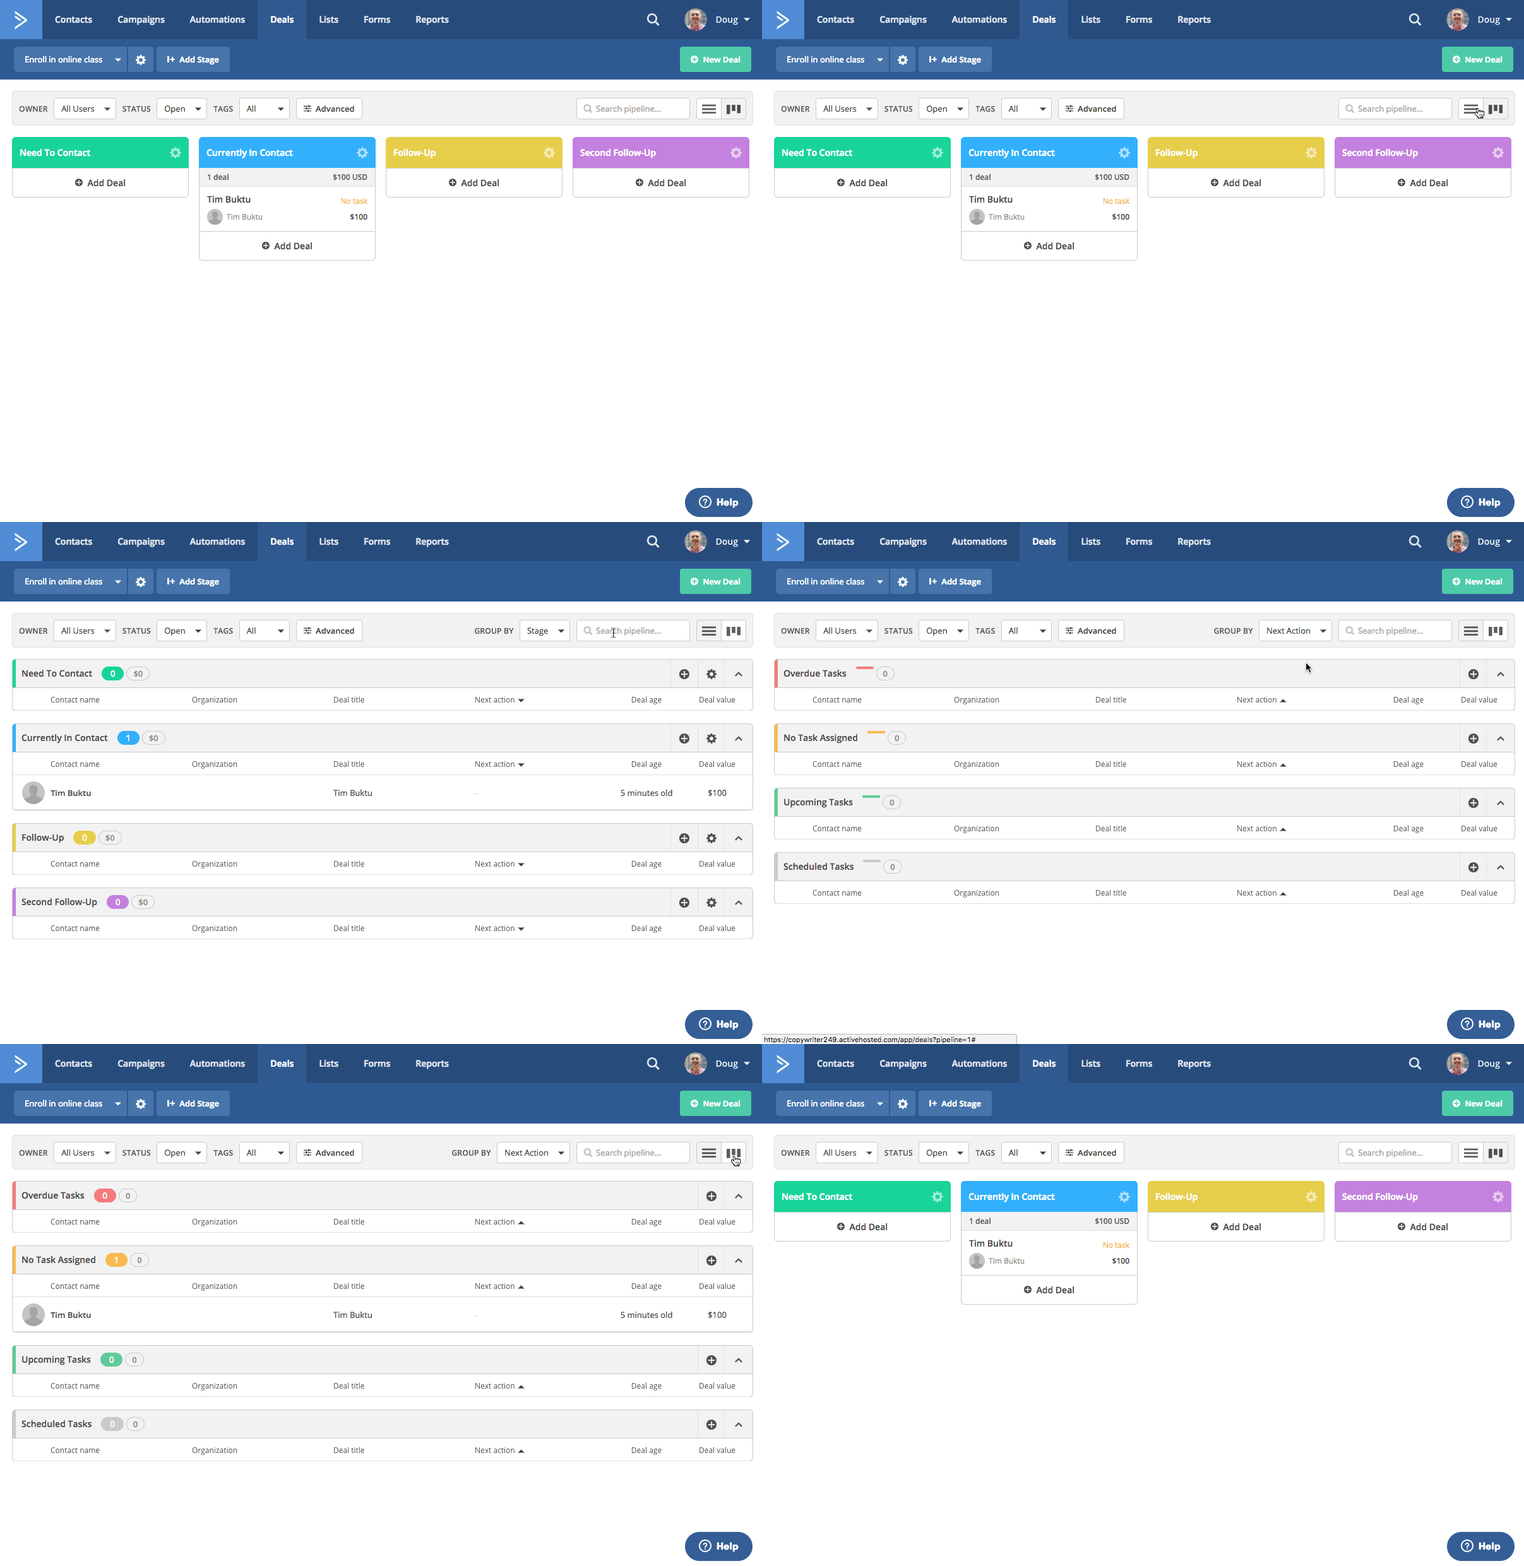
You can further alter “Tasks View” by switching from “Next Action” to “Stage” in the “Group By” dropdown box in the upper right quadrant of the CRM. Grouping by “Stage” presents a visual presentation of the pending tasks in each stage.
When grouped according to next action, only deals with tasks appear. Tasks that are overdue are grouped together. Similarly, “upcoming tasks” and “scheduled tasks” are separate groups. Deals that don’t have tasks assigned to them are grouped together, as well. Such organization allows you to quickly decide which deals need immediate attention, regardless of what stage they are at in the pipeline
No matter if you group by “Next Action” or “Stage”, you can add deals in “Tasks View” by clicking the plus sign all the way to the right of each grouping.
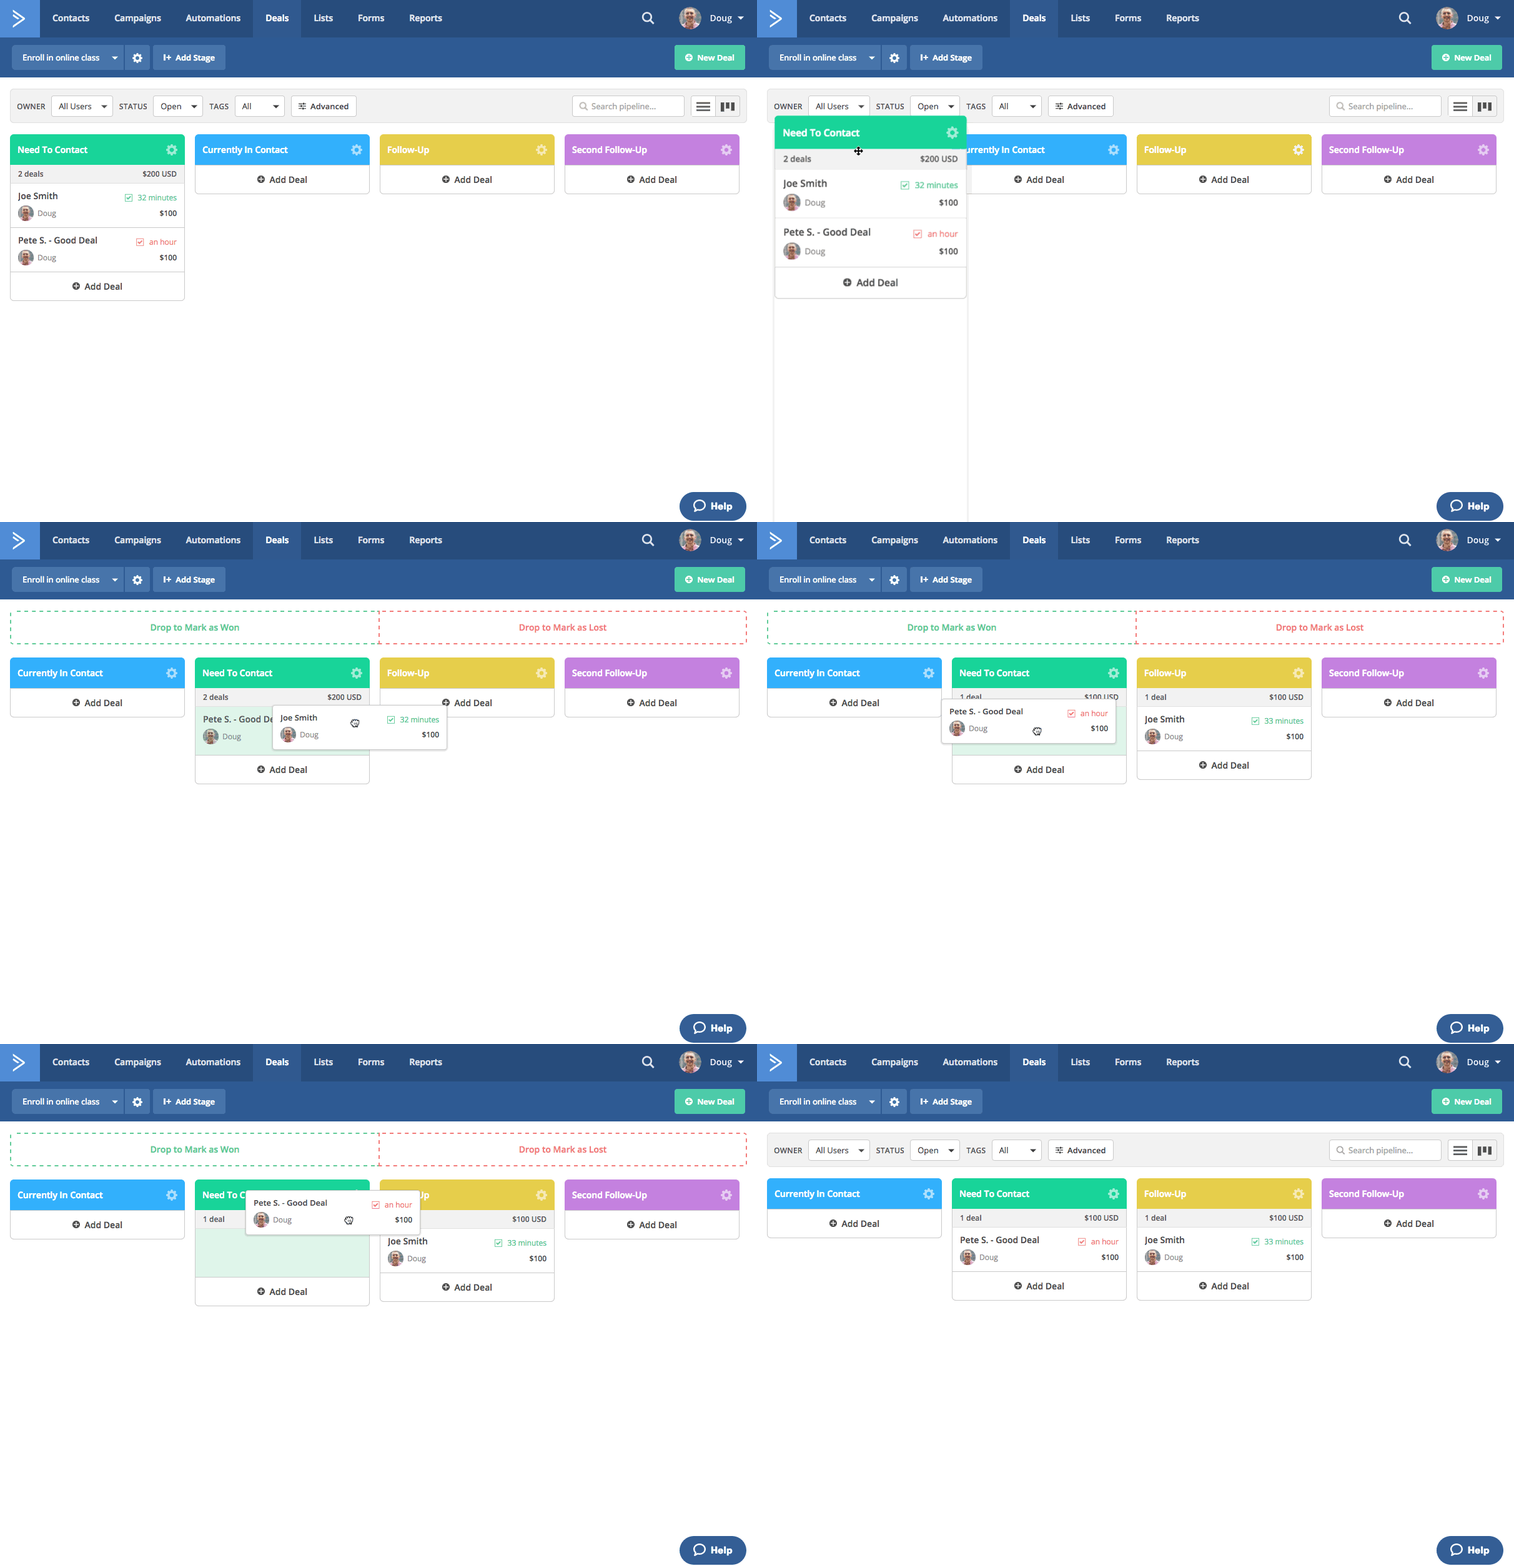
In the other view — where pipelines and their stages are horizontal — drag-and-drop capabilities allow you to effortlessly change the order of stages, as well as move deals from one stage to another.
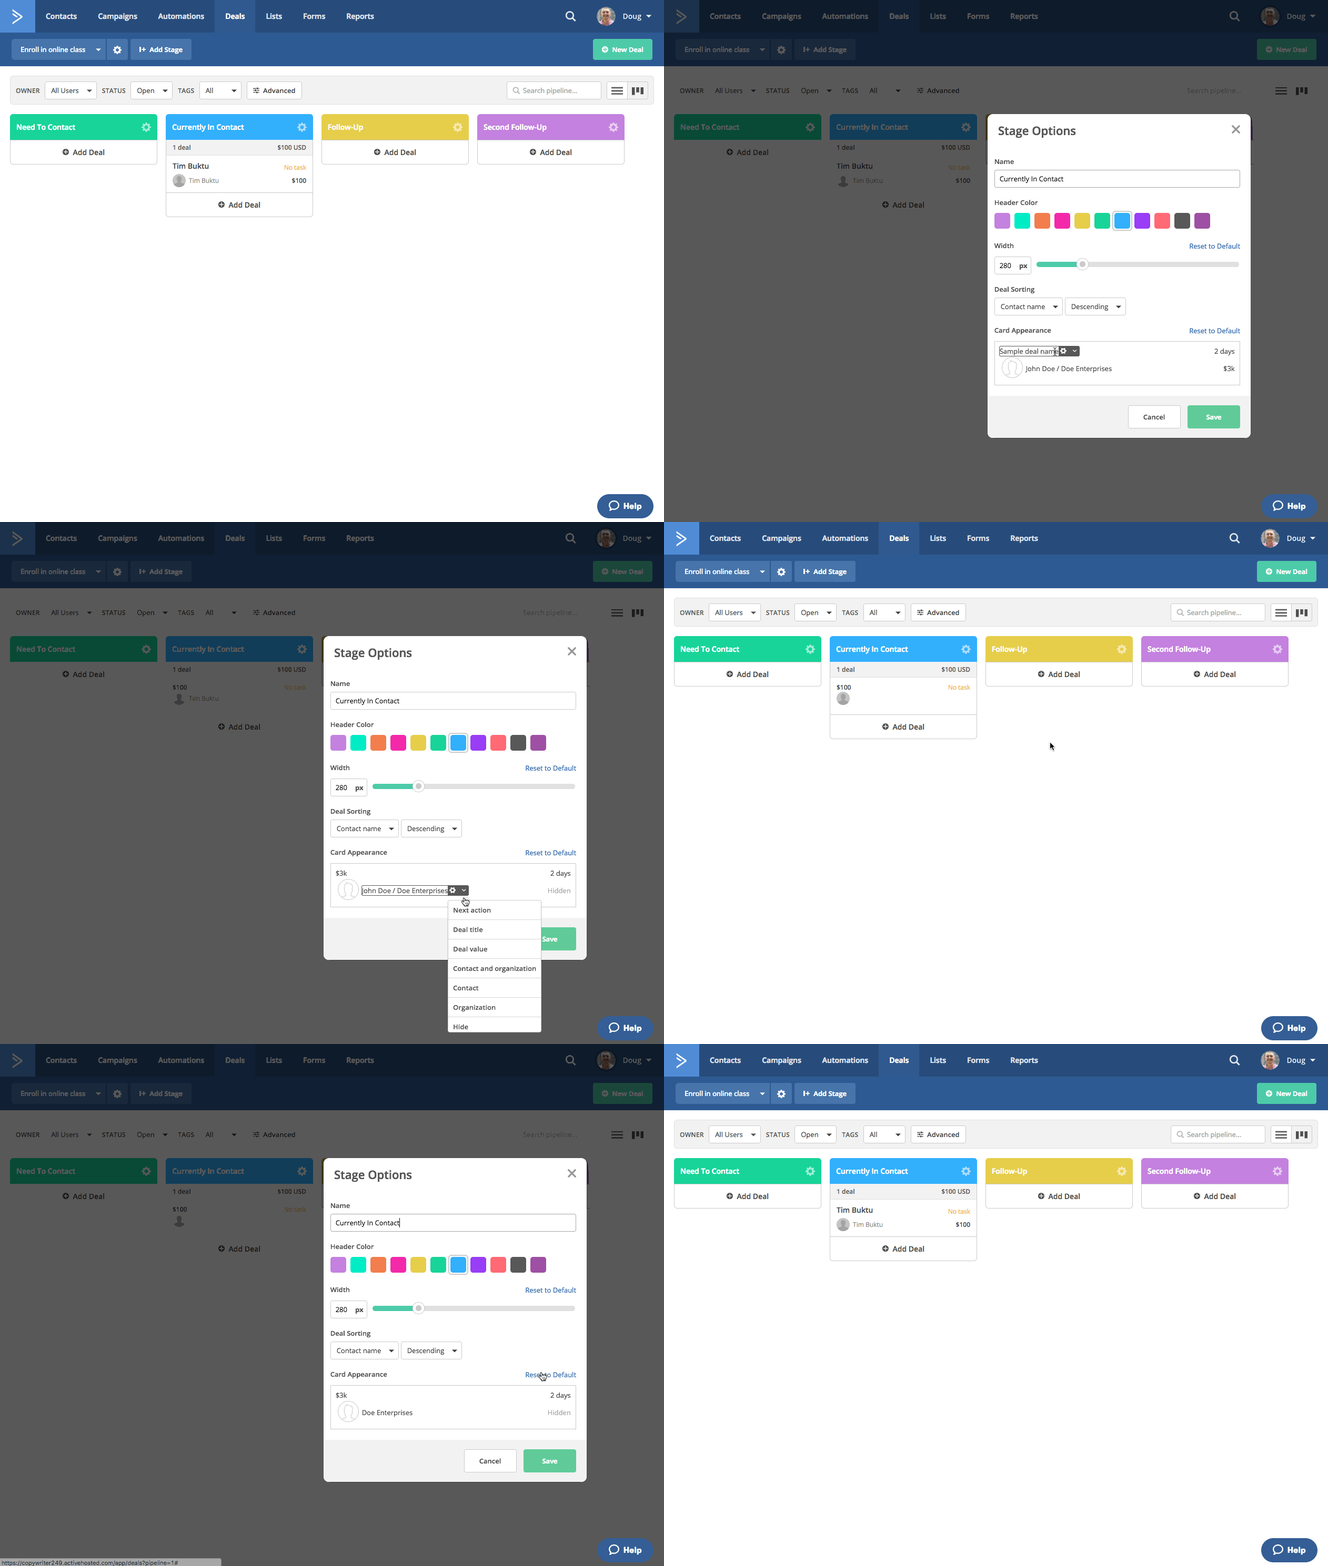
Additionally, you can choose what information appears for deals on each stage.
To do so, click on a stage’s gear icon. In the window that pops up, go to “Card Appearance” at the bottom. In that section, you can choose what information you want to see for all deals in that stage, as well as what corner of the deal card you want to see the data in.
That feature is yet another example of the seemingly limitless customization available in ActiveCampaign.
Automated deal creation
So that’s how you add deals manually. You simply click one of the buttons that brings up the “Add Deal” window. There, you name the deal and assign it a value (more on that soon), choose what pipeline and stage it belongs to, and determine the “User” (aka which internal team member is responsible for said deal and automatically notified of any updates to it). To finish, you simply add contacts’ information. Manual deal creation is really easy to do on a small scale.
However, if your business is booming like we hope it is, manually creating deals is quite the undertaking. But don’t fear. ActiveCampaign has the tools to automate the entire process.
To automate deal creation, click the “Automations” tab to go to the automation builder (remember, automations fuel contacts’ progression from stage to stage in your pipelines; to automate deal creation, you must have already created pipelines; you can also craft automations for any business operation).
In the example below, the criterion for entering the automation is “a contact’s lead score changes to above 80.” So, when contacts meet that criterion, they automatically enter that automation.
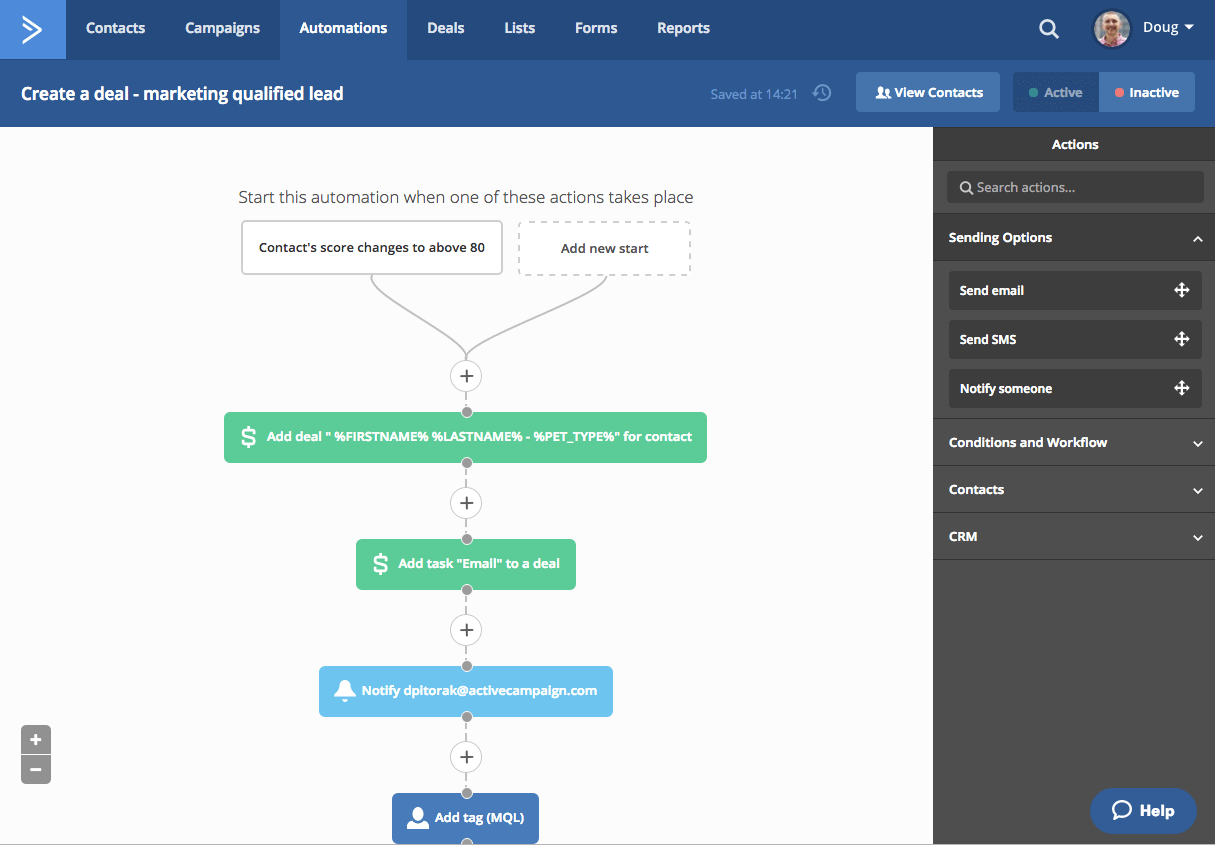
If that automation is tied to any of your sales pipelines, you’ll want to create deals for each criteria-fulfilling contact that enters so you can manage and track them in our CRM. By adding a deal to the automation, you configure ActiveCampaign to automatically create deals for each contact that enters the automation; in one sense, deals are a way to record pipeline entry and all subsequent actions contacts take in the pipeline.
Without question, automated deal creation is an enormous time and effort saver.
There are two ways to add deals to automations:
1. Click the plus sign at the point in the automation where you want to add a deal. Doing so brings up the “Add new action” window. Click on “CRM” and then click on “Add deal”. There, in the “Add a Deal” window, you can name the deal, assign it a value, and determine the pipeline, stage, and owner (internal team member) it belongs to.
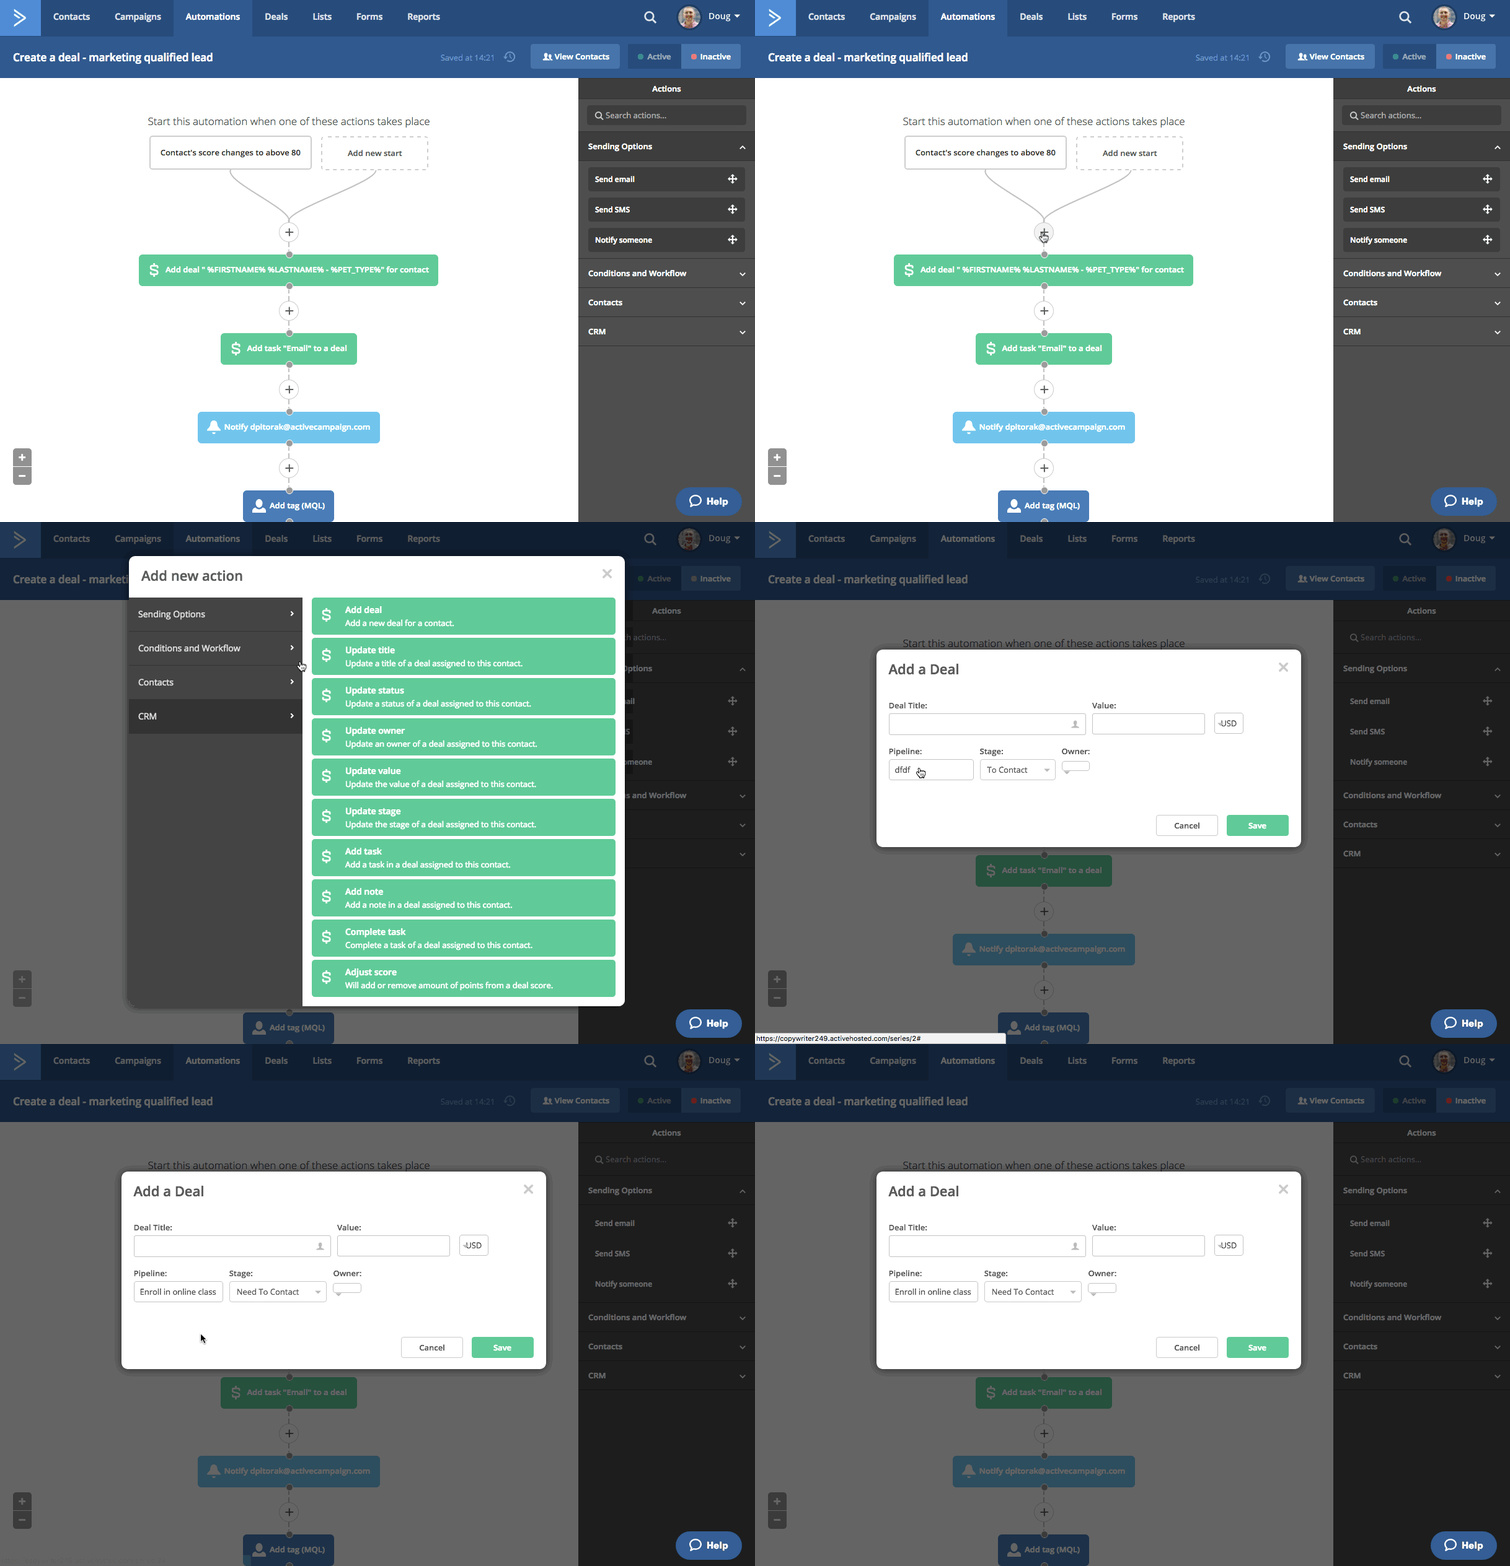
You’ll notice in our example that personalization tags (perhaps known to you as merge fields) are in the “Deal Title” field. Inserting personalization tags configures the automation to not only create deals for each contact but also to assign personalized names to each deal. That way, every criteria-fulfilling contact in each pipeline is automatically represented as a uniquely-named deal.
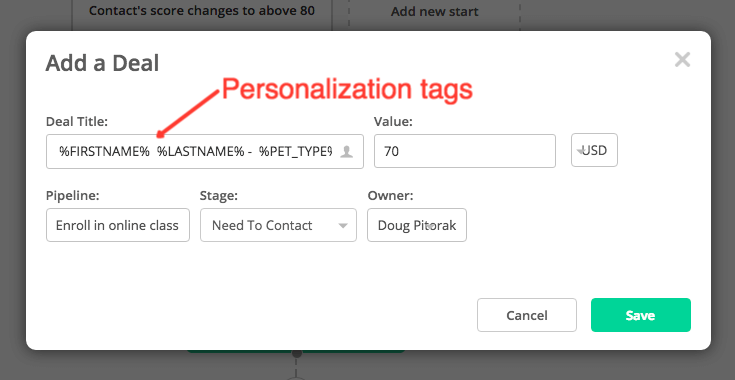
Once you have that information placed, click save and give yourself a pat on the back. Your deal creation is now automated!
Personalization tags are a byproduct of custom fields. If you followed our migration guide, you should have created custom fields before importing your contacts to ActiveCampaign.
2. Another way to add deals to automations rests in the “Actions” menu at the right of the automation builder. Click the CRM button in the sidebar to get a drop-down list of actions. “Add deal” is the first one. Click, hold, and drag the “Add deal” button to a plus sign in the automation. Doing so again presents you with the “Add a Deal” window. Fill in the information and click save.
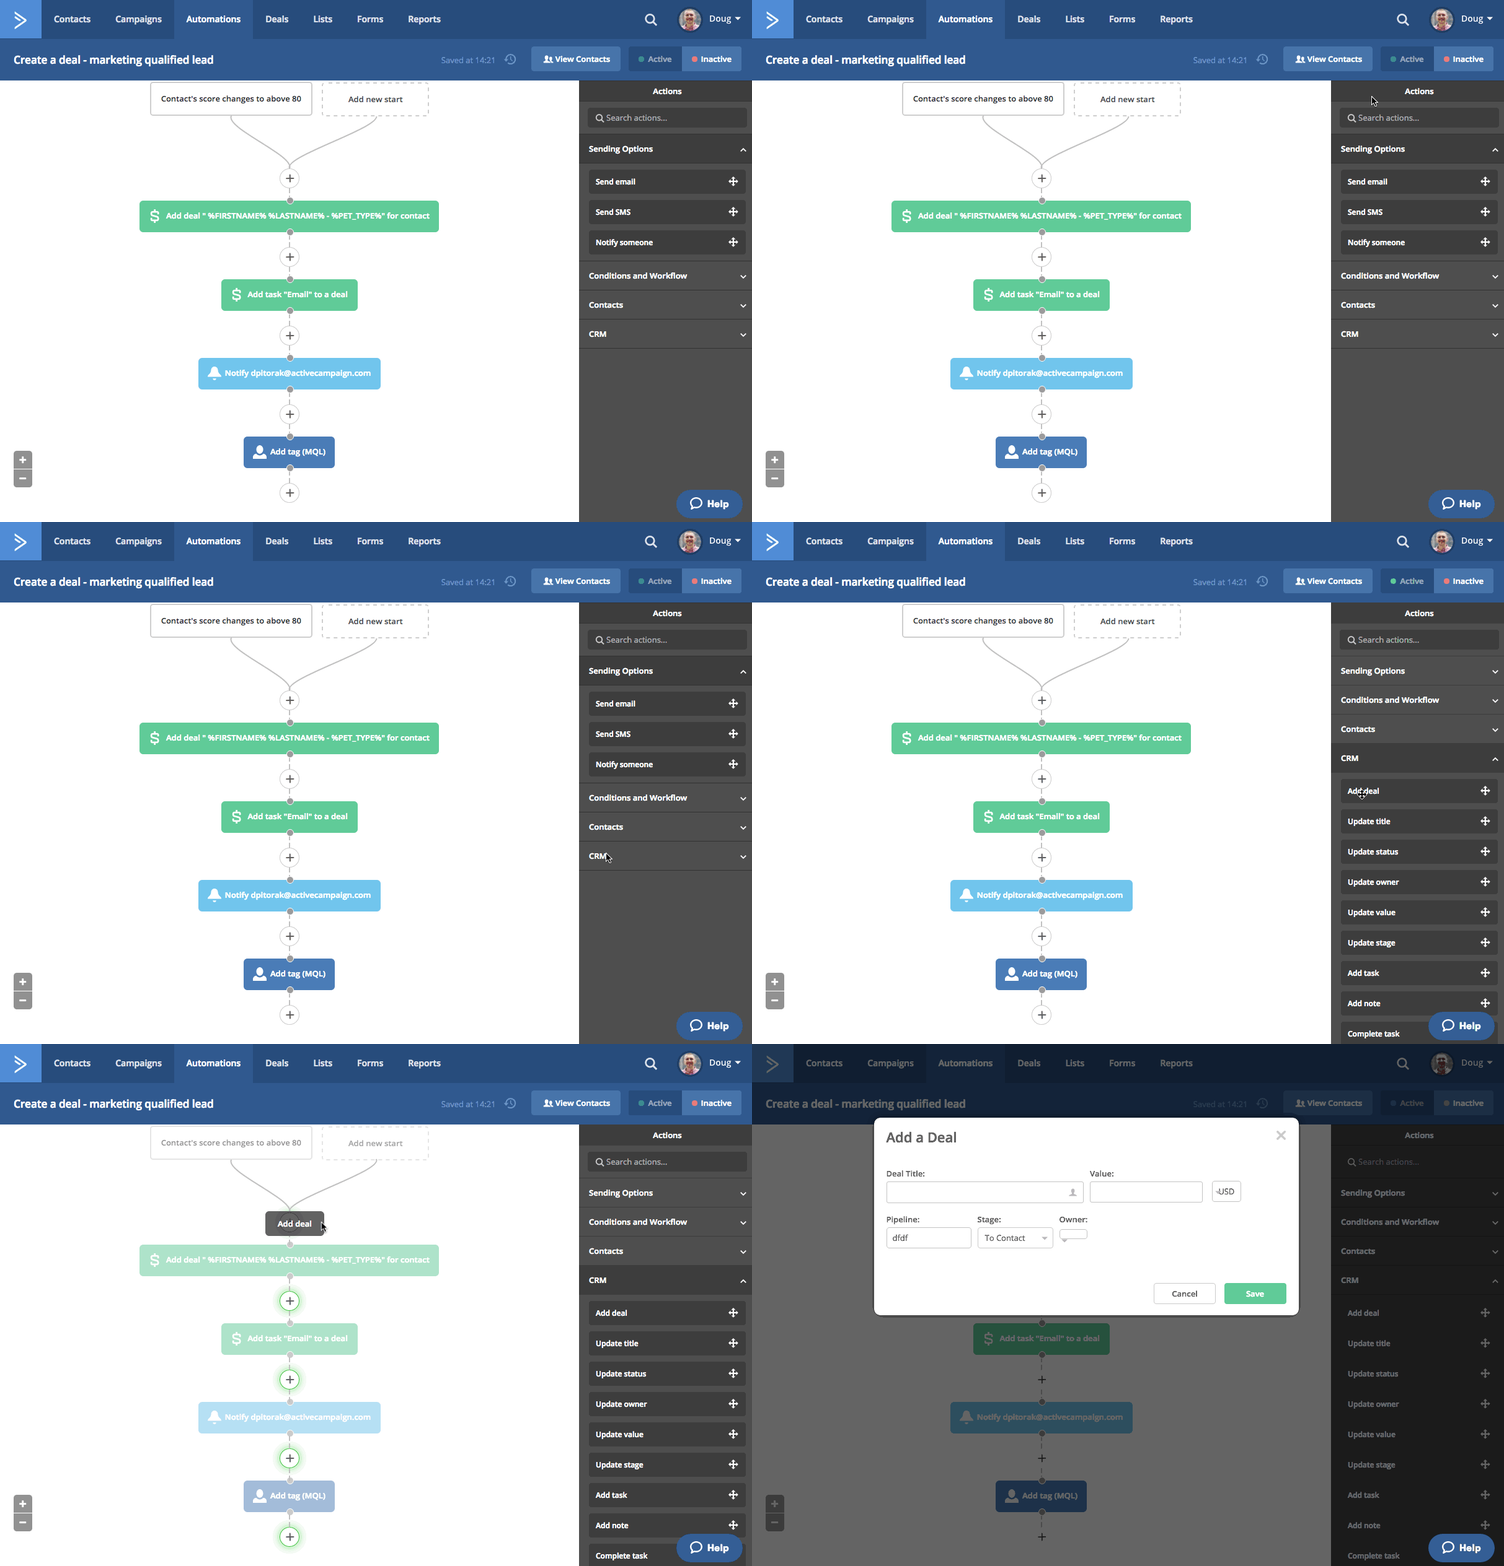
Boom. Deal creation, automated.
Using Deals In ActiveCampaign
Now that we’ve explained what deals are and how to create them, we want to share how our CRM helps you.
Let’s focus on the primary function of the CRM: managing your sales pipelines.
Among other benefits, our CRM allows you to:
- Automate your entire sales process
- Accurately project revenue
- Assess the strong and weak stages of your pipelines
- Easily identify deals most likely to be “won”
- Maintain record of what deals your internal team members are responsible for
To help you get all that and more out of our CRM, we compiled a list of best practices. Use it for guidance, and don’t hesitate to comment on this guide with other principles you follow.
Best Practices For Using Our CRM
- Automate deal creation
- We recommend automating deal creation
- It is a simple and powerful way to track every contact who enters your pipelines
- Manual deal creation works best on a very small scale
- Assign values to deals
- Assigning values helps you visualize and predict revenue
- Values should correlate to an actual product price
- You see where the most valuable deals are in your pipelines and can act accordingly
- Score deals
- Most useful when you have multiple pipelines
- If one contact enters two of your pipelines, a unique deal represents that same contact in both
- Thus, scoring deals based on contact behavior helps predict which deal is most likely to be won
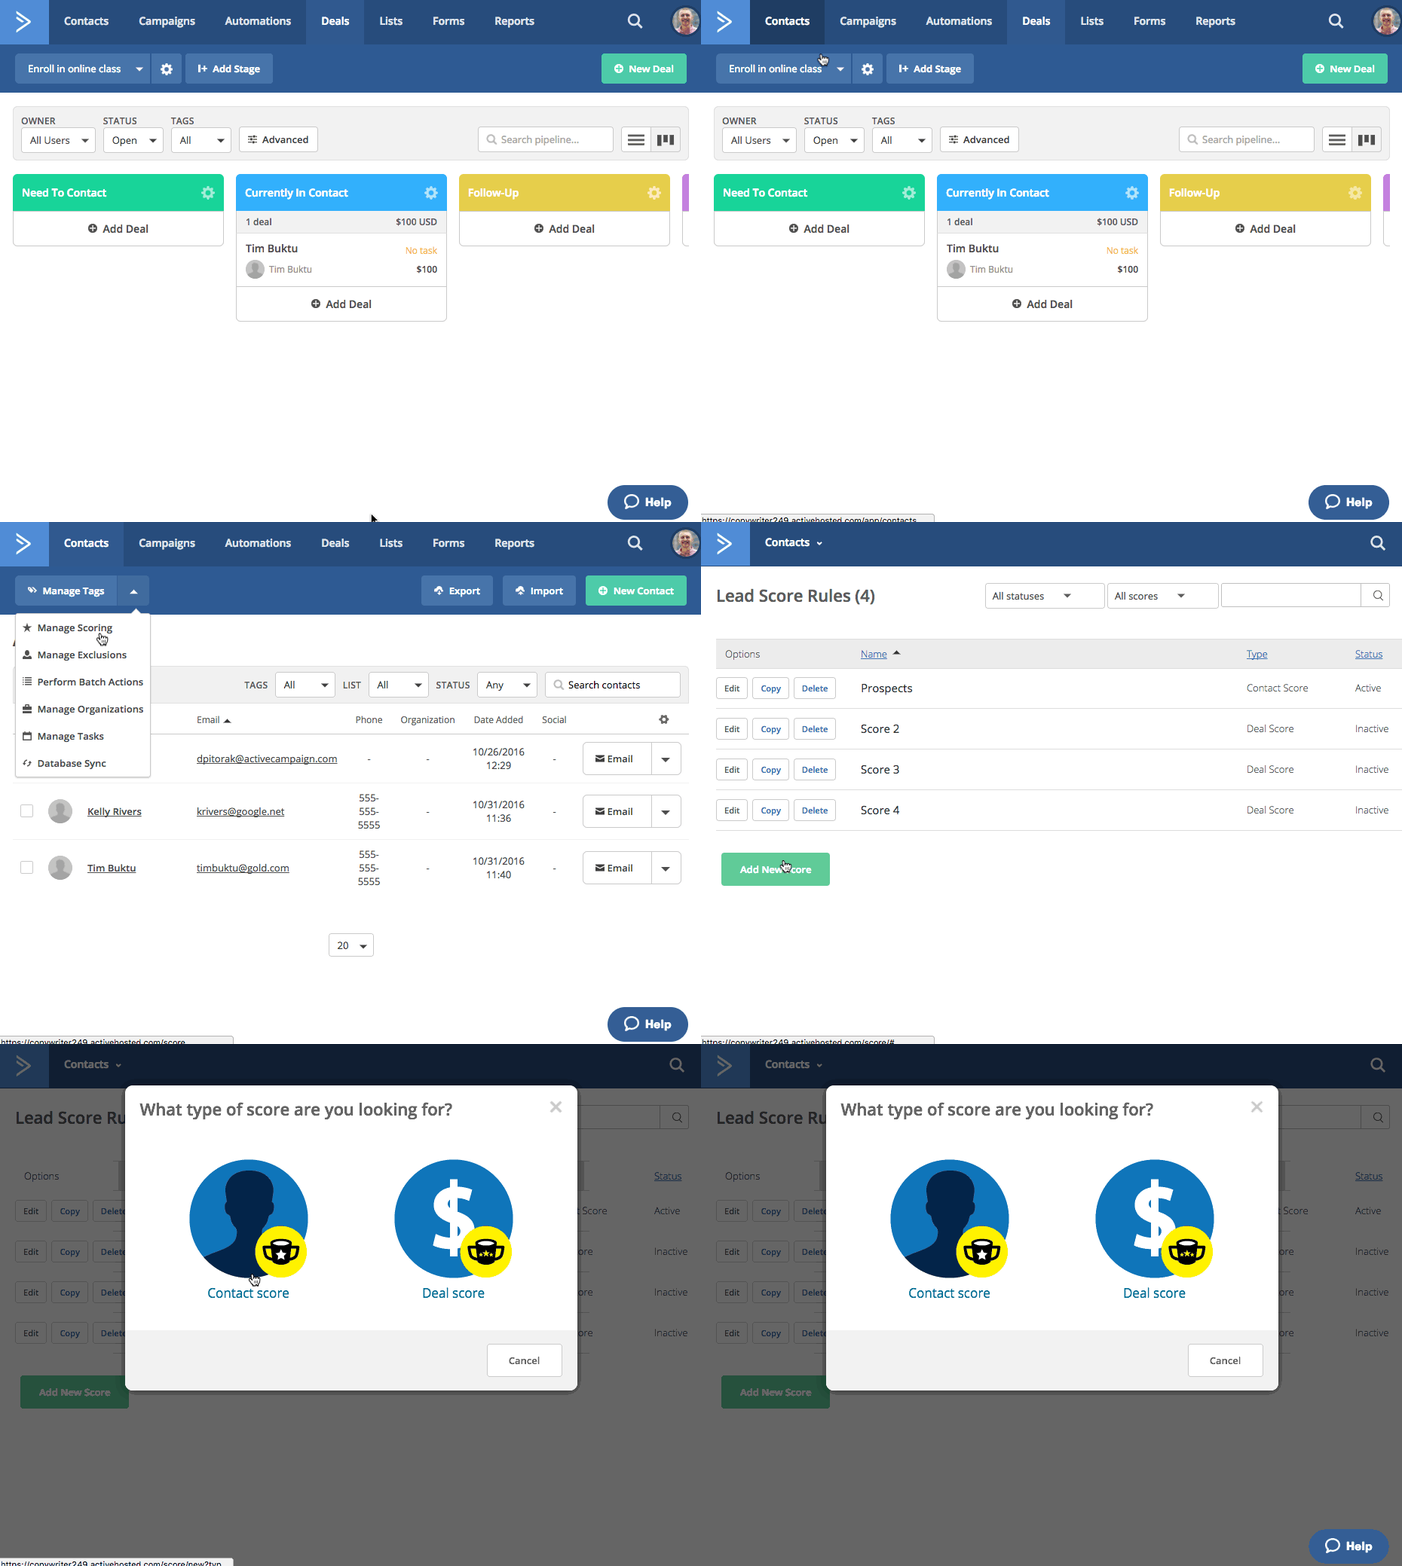
- Filter deals for clear organization
- You can filter deals by status (open, won, lost)
- You can filter by contact tags and by owners (internal team members in charge of deals)
- Click “Advanced” in the CRM for these more sophisticated filters: deals created between two dates; deals updated between two dates; deals valued between two values; deals with common tasks/next actions; deals that contain certain keywords or phrases; and deals that have a certain deal score
- Don’t create “won” and “lost” stages
- People often want to create “won” and “lost” stages in their pipelines
- That is not necessary, as deals do not move from the stage they are won or lost in
- Filtering deals by status, however, reveals which stages deals are most often won and lost in
Closing Remarks
When understood and used properly, our CRM can be one of the most powerful assets of your business. It possesses the impact and flexibility you’ve come to expect from ActiveCampaign. We hope this guide opened your eyes to our CRM’s infinite potential.
If you found this guide helpful, share it with someone who you think could use it. And of course, feel free to drop us a comment below!
