

You’ve got a healthy, engaged list of contacts who are familiar with your brand and enjoy your content… so why aren’t they buying anything from you?
It could be due to a number of reasons:
- They aren’t ready to buy yet
- They’re busy
- They can’t afford it at the moment
- They haven’t been convinced that your product is for them
All these reasons have one thing in common: Your contacts are focused on their own lives and problems. David Priemer, a thought leader in Sales, says: “Customers care more about their problems — not only the ones in their businesses, but in their lives — than whatever solution you want to sell them.”
In this post, we’ll showcase 12 automation recipes to help you boost your sales. Whether you use a sales CRM to manage your pipelines or sell through an ecommerce store (or both!), these recipes can help you sell more through automation:
- Abandoned Cart Reminder
- Create Deal From a Form
- Ecommerce Product Sales Drip Email Series
- Engage Prospects Interested In Pricing
- Product Interest Tagging
- Targeted Product Interest Follow-Up
- Product Category Interest Tagging
- Send Email Coupon After First Purchase
- Accessory Upsell After Purchase
- Adjust Expected Close Date On A Deal
- Move Deal to the Next Stage When Task is Completed
- Create Task to Call or Email New Deal
1. Abandoned Cart Reminder

A contact is shopping on your ecommerce site. They fill their cart, they go to look at their cart. And then, just like a bird who sees something shiny, their attention abruptly shifts. And the abandoned cart is all that remains of their visit.
What happened?? A classic case of an online abandoned cart.
Why do people abandon online carts?
It happens for a number of reasons, including:
- The prices got too expensive
- They were creating a wish list cart they never intended to buy
- They left to check a competitor product or price
- They decided they didn’t need an item after all
- They got hungry and went for pizza
It can really be anything, but what’s more important to know is that you can still get them back — with an automated abandoned cart reminder email.
That’s where this automation recipe comes in handy.
How does the abandoned cart reminder automation work?
- A contact triggers the automation by abandoning their cart.
- After a specified amount of time, the contact moves through the automation to a condition.
- Depending on the condition requirements, the contact is either removed from the automation or sent an abandoned cart reminder email.
How do you use this abandoned cart reminder automation recipe?
- To use this automation recipe, make sure you have either a Shopify and WooCommerce Deep Data integration connected to your ActiveCampaign account.
- Create a trigger that enters the contact into the abandoned cart sequence. This trigger is activated when the contact fulfills the requirements you set. For example, you can configure the trigger to activate when a contact abandons a cart valued at $50 or more, or if a certain item is left in the cart.
- Create the abandoned cart email reminder that will get sent if the contact fulfills the condition.
- Once the trigger is activated and a contact enters the automation, specify how long you want to wait before the next step happens. You can set this time based on your needs.
- After the time period passes, the automation takes them into the next conditional step. If they recovered their cart on their own before the time period ends, they leave the automation.
- If the contact still hasn’t recovered their cart, the automation sends them the cart abandonment email that you created.
What do you need to use this abandoned cart reminder automation recipe?
Just an ActiveCampaign account, either a WooComerce or Shopify connection set-up, and a contact list!

2. Create Deal From a Form

Are you looking for a way to automatically create a deal in the CRM when a contact submits a form? Do you wish there was a way to automatically add a deal to your sales pipeline and notify the deal owner when a form is submitted?
The Create Deal From a Form automation recipe creates a deal for a contact in the CRM after a form submission. When a website visitor submits a contact form, this automation:
- Creates a deal for the contact
- Adds the deal to your sales pipeline
- Assigns a deal owner (Optional)
- Creates a follow-up task
- Pulls contact information from the form submission (Optional)
- Notifies you of new contact information
How does the create a deal from a form automation work?
If a contact submits a form and already has an open deal in your CRM, another deal will not be created. Instead, the automation will notify you of the form submission and that new contact information may be available.
This automation recipe works to streamline deal based workflows and ensures that no leads who click your call-to-action (CTA) fall through the cracks. You (or your sales reps) will be assigned a new deal and follow-up task to qualify the opportunity.
Here’s how the create deal from a form automation recipe works:
- The automation is triggered when a contact submits any form
- The automation then checks to see if the contact matches the condition of “deal status is open”
- If that contact has an open deal, a notification will be sent to the email address of your choosing
- If there isn’t a deal for that contact, the automation will create a deal and add a follow up task
- (Optional) the automation will assign a deal owner and add the deal to a specific pipeline and pipeline stage within the ActiveCampaign CRM.
- A notification email will be sent that the contact submitted a form and a deal has been created.
What do you need to use this create deal from a form automation recipe?
Just an ActiveCampaign account, your CRM set up, and a contact list!
3. Ecommerce Product Sales Drip Email Series

Ecommerce Product Sales Drip Email Series Automation Recipe
Do you wish there was a way to automatically promote your ecommerce products to your email subscribers?
Send a series of automated ecommerce sales emails and sell your products with email marketing using this automation recipe!
A drip sequence is a series of emails sent to your contacts, customers, or prospects at specific dates and times. When a contact subscribes to your email list, they will receive each email in the series at intervals you choose. This automation recipe sends 1 automated sales email per day for 4 days, but you can adjust the wait steps and number of emails to your liking.
How does the ecommerce product sales drip email series automation work?
ActiveCampaign checks the contact’s activity throughout the automation. If and when a contact purchases a product, they are tagged as “Customer” and removed from the automation. This means they won’t receive more emails encouraging them to purchase a product they’ve already purchased.
This ecommerce drip series helps you:
- Sell ecommerce products with email marketing
- Increase awareness for your ecommerce products
- Encourage prospects or existing customers to purchase
- Stay in front of your potential customers
- Discover which of your contacts are engaged
- Determine who is buying your ecommerce products from email
- Create or develop your ecommerce email marketing automation strategy
Here’s how the ecommerce product sales drip sequence works:
- A contact subscribes to your email list
- The automation waits until the contact’s timezone is 10 am (or a time of your choosing)
- They receive the first email of the series
- The automation waits 2 days
- They receive the second email of the series
- The automation waits 2 days
- They receive the third email of the series
- The automation waits 2 days
- They receive the fourth and final email of the series
- The automation waits 1 day
- The automation checks the contact’s activity to see if they have converted and made a purchase
- If yes, the contact reaches the goal “Has Made a Purchase”, is assigned a “Customer” tag, and is subscribed to a new contact list for customers
- If no, the contact is assigned a “Didn’t Buy On Drip” tag
- The automation ends
What do you need to use thisecommerce product sales drip sequence automation recipe?
Just an ActiveCampaign account, either a WooComerce or Shopify connection set-up, and a contact list!
4. Engage Prospects Interested in Pricing

How do you engage potential customers interested in discussing pricing? Are you looking for a way to schedule a call with an engaged contact who has viewed your pricing page?
With the Engage Prospects Interested In Pricing automation recipe you can send a meeting request email to automatically reach out to begin a sales conversation with contacts who repeatedly visit your pricing page.
How does the engage prospects interested in pricing automation work?
This automation first checks to see if the contact has already scheduled a meeting with you. If they have, the automation checks to see if there is an existing deal in the CRM for that contact. If there isn’t an open deal, the automation creates a deal record in the CRM. If a contact has scheduled a call with you, the automation will not invite that contact to schedule a meeting via email.
If the engaged contact has not scheduled an appointment with you, the contact will receive an automated meeting request email to schedule a call and discuss pricing.
This automation recipe keeps your leads organized by confirming the deal status of the contacts that view your pricing page.
Here’s how the Engage Prospects Interested in Pricing automation recipe works:
- The automation is triggered when an existing contact visits your pricing page or (optional) another page that indicates product interest or purchasing intent
- The automation checks if the contact has scheduled an appointment, or has a “meeting scheduled” tag applied
- If yes, the automation checks for an open deal in the CRM and creates a deal if one doesn’t exist
- If no, the automation sends a meeting request email to schedule a sales conversation and answer their pricing questions
What do you need to use this abandoned cart reminder automation recipe?
Just an ActiveCampaign account, site tracking, and a contact list! Optionally, you can use this automation recipe alongside scheduling software tools including Calendly, AcuityScheduling, or Google Forms.
5. Product Interest Tagging

Do you wonder who your customers are? Do you want to know what they like, what they don’t like, what they might like later?
Guess what — you can! Site tracking helps you learn more about your customers every day — and use it to interact with them in a way that makes them respond. But that’s a lot of info to remember.
Luckily, you don’t have to remember it all. You can create an automation that tags people’s interest and keeps track of all of that info for you.
The “Product Interest Tagging” recipe generates the tag for each contact based on product page views from your website. Then those tagged contacts enter the “Product Interest Targeted Follow-Up” automation recipe to receive targeted messaging based on the tags created in this automation.
Create stronger connections with your contacts through targeted emails.
How does the product interest tagging automation work?
- Set up Site Tracking with your specified URL before you import this recipe. This is how contacts gain a site tracking cookie
- This automation begins when a contact visits the page specified in your start trigger.
- Note: A contact starts becoming tracked by site tracking when they either click on a tracked link in a campaign leading to a tracked page or by submitting an ActiveCampaign form on a page with the site tracking code on it.
- You can also set a wildcard URL by specifying the URL to a point and then using an asterisk. The contact will then meet the condition for any page after the URL listed. Example: If you had an automation set to www.activecampaign.com/marketplace/*, it would trigger an automation when a contact visits any page on the Marketplace.
- A contact moves to the If/Else action. Enter the URL of the same product in both conditions. Here we are assigning separate tags to people who have visited the product page more times than others.
- For example, you can separate people who visited 6+ times from everyone else who visits under 6 times. You can specify the number of page visits required for a “Very Interested in Product X” tag vs. an “Interested in Product X” tag. You can set your preferences by clicking the If/Else action, the box which reads “Does the contact match the following conditions?”
- Use these tags to segment and send targeted offers to contacts.
What do you need to use this product interest tagging automation recipe?
Just an ActiveCampaign account, Site Tracking, and tracked contacts!
6. Targeted Product Interest Follow-Up
How do you follow up with customers that are interested in your products? How do you turn a one-time customer into a repeat customer? Are you looking for a way to send marketing emails based on customer interests?
With the Targeted Product Interest Follow-Up automation recipe you can send a series of targeted follow-up emails to encourage prospects to make a purchase. The email automation is triggered when a certain tag is applied to a contact, which is a form of segmentation based on product interest.
This automation recipe works perfectly with the “Product Interest Tagging” automation recipe. The “Product Interest Tagging” recipe generates the tag for each contact, then enters that contact into the “Product Interest Targeted Follow-Up” automation recipe
Using site tracking data, or existing customer data, ActiveCampaign applies a tag to certain contacts and begins the automation. This automation recipe sends 5 relevant marketing emails based on customer interests over the course of 17 days.
With this automation recipe, you can:
- Promote your online store
- Strengthen your relationship with potential customers
- Send marketing emails to existing customers
- Send marketing emails to prospective customers
- Get information about which contacts are interested in your products
Here’s how the Targeted Product Interest Follow-Up recipe works:
- The automation begins when a “product interest” (or equivalent) tag is added to a contact
- The automation waits 1 hour
- The “Coupon for Product 1” automatic email is sent
- The automation waits 2 days
- The automation sends an email with content related to product interest
- The automation waits 4 days
- An automated email with more content related to the product interest is sent
- The automation waits 5 days
- An automated email with more content related to the product or another product coupon is sent
- The automation waits 4 days
- A final sales email is sent with more content or an additional product offer
- The automation waits 2 days and ends
Notes: The content in each email is up to you. Any email could contain content, recommended products, an offer, a discount, or some other incentive for your customers to make a purchase.
The wait steps between each automated email send can be changed to any length of time you prefer if you’d like to change how often you follow up with prospects.
The automation checks the customer status of each contact throughout the automation, so if a contact makes a purchase at any point in the automation they will be removed and will not receive any additional emails encouraging them to purchase a product that they have already purchased.
What do you need to use this targeted product interest follow-up automation recipe?
Just an ActiveCampaign account, an ecommerce integration, and a contact list!
7. Product Category Interest Tagging

How do you turn a customer into a repeat customer?
Send them relevant, automated campaigns that keep them interested. You can do this by using tags.
What are tags?
Tags are how you segment your customers in order to send them the campaigns that cause continued customer engagement. Tags are added to a contact on your email list when they complete a specific behavior or set off a trigger. The tags then help create segments so you can target specific audiences with your campaigns.
Tag-based email marketing helps create even more personal connections between you and your contacts. In this automation recipe, the tags are assigned based on a purchase being made.
How does product category interest tagging work to achieve this?
Let’s say you sell musical instruments, and you have a contact that makes a couple of product purchases — a guitar and some drums. After those purchases that contact triggers assigned tags for things like “Strings” and “Percussion.”
The more tags a contact has assigned, the better, targeted emails they receive. When a contact gets emails they want, they are more likely to keep interacting — which gives you the chance to further tag them.
How does a product category interest tagging automation work?
- You create product category tags within ActiveCampaign
- A contact makes a purchase, and enters the interest tagging automation
- The automation tags the contact with a tag based on the product they buy and the associated interests with that product
- Create future target audiences easily based on their specific tags from purchases. You can then use these tags later when targeting your segments.
- You can add as many branches of If/Else statements to this automation as you’d like. For every product category you have set up on your ecommerce site, it’s good to have a tagging opportunity.
What do you need to use this product category interest tagging automation recipe?
Just an ActiveCampaign account, a native ecommerce integration (like Shopify, WooCommerce, or BigCommerce) and a contact list!
8. Send Email Coupon After First Purchase

Say thank you to first-time customers by rewarding their first purchase with a special discount or coupon over email. Sending an email coupon after their first purchase encourages shoppers to become repeat customers.
Successful coupon campaigns can help you boost customer loyalty:
- 68% of customers say coupons generate loyalty
- 82% of people are more likely to continue using a retailer that offers consistent deals
Add this automation to your coupon marketing strategy to send offers and discounts to first-time customers. Emails offering discounts to customers see a 48% increase in revenue per email.
Before you can use this automation recipe, you need to set up an integration with your ecommerce store.
Here’s how the coupon after first purchase automation works:
- A customer places their first order with you
- The automation sends the customer an email with a discount code or other special offer. ActiveCampaign does not dynamically generate coupon codes; you will need to supply the discount codes manually, through custom fields, or with an integration.
- The automation ends
What do you need to use this coupon after first purchase automation recipe?
Just an ActiveCampaign account, an ecommerce integration, and a contact list!
9. Accessory Upsell After Purchase

A contact buys from you, maybe multiple times. But you know that there’s more to add to their purchases that they would love to have.
Sometimes they don’t think of it first, so you can send them an automated email to upsell the additional products they could want.
What is upselling?
Upselling is a sales technique where a business entices a customer to buy more expensive items, upgrades or other add-ons after an initial purchase to complete their experience with the purchased product.
For example, if the contact has purchased a guitar, you may want to incentivize the purchase of a stand or capo. You can incentivize an upsell email campaign with discount codes and free shipping.
Better product experience for them, better sales for you. Win-win!
And you can automate this process with an accessory upsell after purchase automation recipe. This means that you don’t have to create your own flow of emails to send after each purchase. This automation recipe is ready to use and can be customized for your upsell needs.
How does an accessory upsell after purchase automation work?
- A contact makes a purchase through a native ecommerce integration and enters the automation
- After this trigger, a specified wait time begins between the time of purchase and when the upsell campaign sends. This short wait time is to see if the contact didn’t include the additional accessory in the original purchase. You can customize this wait time.
- The contact moves into the “If/Else” condition. This action looks to see whether the contact has bought both the product and the accessory product.
- If they didn’t get the accessory, they go down the “Yes” path and receive the upsell email incentivizing purchasing the accessory product. If they already bought it, the automation ends.
What do you need to use this accessory upsell after purchase automation recipe?
Just an ActiveCampaign account, a native ecommerce integration (like Shopify, WooCommerce, or BigCommerce), and a contact list!
10. Adjust Expected Close Date on a Deal

Every sales prospect is different. You can imagine how the sales process should go, and plan how you expect it to go from the first call to marking the CRM deal as ‘Won.’ But sometimes things happen. Progress slows down or speeds up, and you need to make adjustments to your sales timeline to complete a sale.
Changes in the sales process happen frequently. That’s why you can automatically adjust your CRM deal closing date in ActiveCampaign.
The adjust expected close date on a deal automation recipe is here for you. It does the math so you don’t have to.
When a prospect moves to new CRM pipeline stages, this automation will use the Math action to automatically add 7 days (or your customized length of time) to the original given close date. This gives you more time to engage with a prospect and close the deal.
How does an adjust expected close date on a deal automation work?
- Before using this automation, remember to create a custom date field and name it. It can be called something like Intended Close Date or Expected Close Date.
- To build a custom date field, go to the Lists tab in the platform, then the Manage Fields Page and click New Field. Name it and choose the type as “Date”
- Import the automation and click the Math action to select your settings.
- NOTE: You might see an error when you create the automation and it asks you to select a custom date field. That just means you don’t have the field labeled the same as the original ActiveCampaign recipe template. When you create your custom date field, you can name it whatever you want, just make sure to select the one you have created in your account.
- Adjust the number of days to what makes sense for your business
- This automation is triggered when a deal moves between stages in a pipeline. You can set this up for specific stages — like if a contact moves back to an earlier stage, you could add more time. Or you could use this as a general increase in days for any stage movement.
What do you need to use this adjust expected close date on a deal automation recipe?
Just an ActiveCampaign account, CRM pipelines, and deals!
11. Move Deal to the Next Stage When Task is Completed

Automate the movement of deals through your sales pipeline with this automation. As soon as a task is marked complete in your CRM, this automation moves a deal to the next stage of your pipeline and assigns a new task to the deal owner.
If you have multiple sales pipelines and deal stages, manually moving a deal from one sales pipeline stage to the next can be time-consuming and tedious. Automating the tedious parts of the sales process — like assigning tasks and moving deals between stages — gives your sales team more time back to do what they do best: close deals.
What are deal stages?
Different sales pipelines include different stages, but common sales pipeline stages include:
- Contact stage
- Qualification stage
- Meeting stage
- Proposal stage
- Closing stage
- Retention stage
This automation can be used with any automation that involves assigning a task. In a task assignment automation, you can choose to trigger this automation as soon as the assigned task is marked complete.
Each deal can only be moved to one stage per automation. To make sure each deal can move to the next stage, use this recipe to build out an automation for each stage of your pipeline.
Here’s how this automation works to move a deal to the next stage in the pipeline:
- This automation does not have a built-in trigger. Instead, you can use any task assignment automation action to trigger this automation when a task is marked as complete. Use this automation in a series to automate your pipeline.
- Select the stage and pipeline that this automation should move a deal into
- Choose the next task the deal owner needs to perform for the deal’s journey through the pipeline
What do you need to use this move deal to the next stage when task is completed automation recipe?
Just an ActiveCampaign account, tasks set to trigger this automation, CRM pipelines, and deals!
12. Create Task to Call or Email New Deal 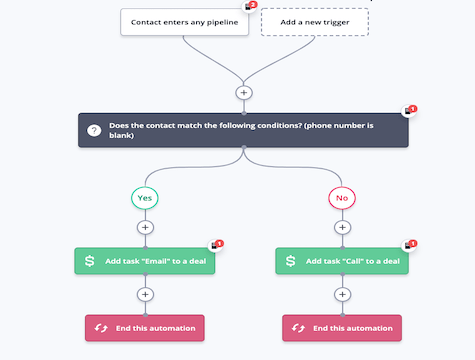
When a new deal enters your pipeline, how does the deal owner know whether to call or email them? Do they have to scour the contact profile for an email address or phone number? What if there’s no phone number listed?
This automation takes the guesswork and manual searching out of the first outreach to a new deal. If a contact does not have a phone number listed, the automation creates and assigns a task to email the contact instead.
Use this automation to streamline your sales processes, save time, and keep your sales pipeline organized and moving with ActiveCampaign tasks.
Here’s how the create task to call or email new deal automation works:
- Before importing this automation, make sure you set up at least one pipeline in the ActiveCampaign CRM.
- The automation is triggered the first time a contact enters a pipeline. You can choose a specific pipeline and segment for this automation, or apply it to all segments and pipelines.
- An If/Else action checks to see if the contact’s phone number field is blank. To set this condition, choose “is blank” from the middle condition dropdown.
- If the contact does not have a phone number, the automation creates and assigns a task to the deal owner to reach out via email.
- If the contact does have a phone number, the automation creates and assigns a task to the deal owner to reach out via phone call.
- The automation ends.
What do you need to use this create task to call or email new deal automation recipe?
Just an ActiveCampaign account, CRM pipelines, and deals!